This guide walks you through self-hosting RustDesk — the open-source remote desktop alternative — with Docker, from OpenWrt port forwarding to a working ID/relay server. You keep full control of your data and get ultra-low-latency connections over your own bandwidth. Ideal for homelab owners tired of commercial tools' throttling, quotas, and compressed image quality.
Why Self-Host RustDesk?
As demand for remote control steadily rises, commercial remote desktop software often comes with compromises like compressed image quality, bandwidth throttling, or connection quotas. RustDesk stands out as an excellent open-source alternative. By self-hosting your own ID and relay server, you not only gain complete control over your data privacy but also fully leverage your home’s public internet bandwidth and IPv6 direct connection capabilities, achieving an ultra-low latency, fluid remote experience.
Official Website: https://rustdesk.com/
GitHub Repository: https://github.com/rustdesk/rustdesk
This comprehensive guide, based on a Docker environment, provides a full hands-on walkthrough covering server deployment, router port forwarding, troubleshooting routing conflicts, configuring display drivers for headless (GUI-less) virtual machines, and performance optimization.
1. Docker Compose Server Deployment
We recommend deploying the RustDesk server using the host network mode. This avoids the NAT overhead introduced by Docker’s virtual bridge networks, allowing your server to directly capture the client’s true source IP address.
1.1. Crafting Your Docker Compose File
Create your docker-compose.yml file:
YAML
version: '3'

services:
  hbbs:
    container_name: rustdesk-hbbs
    image: rustdesk/rustdesk-server:latest
    # Replace yourdomain.com with your actual DDNS domain or public IP
    command: hbbs -r yourdomain.com:21117 -k _
    volumes:
      - rustdesk-data:/root
    network_mode: "host"
    depends_on:
      - hbbr
    restart: unless-stopped

  hbbr:
    container_name: rustdesk-hbbr
    image: rustdesk/rustdesk-server:latest
    command: hbbr -k _
    volumes:
      - rustdesk-data:/root
    network_mode: "host"
    restart: unless-stopped

volumes:
  rustdesk-data:
1.2. Parameter Breakdown & Security Recommendations
-r yourdomain.com:21117: Specifies the relay server address and port.-k _: Enforces public key authentication. External clients without the correct public key will be unable to use your server, preventing public scanning and unauthorized traffic consumption.- Avoid Forced Relaying: Do NOT add
ALWAYS_USE_RELAY=Yto environment variables. This will block direct P2P connections (UDP hole punching and IPv6 direct connections) between clients, leading to unnecessary relay latency and stuttering.
1.3. Launching and Retrieving Your Public Key
Bash
# Start the containers
docker compose up -d

# View the generated public key
docker logs rustdesk-hbbs | grep "Key:"
2. OpenWrt Router Firewall & Port Forwarding
To ensure external clients can connect to your internal RustDesk instance, you’ll need to open and map the necessary ports on your main router.
2.1. Port Mapping Rules Summary
| Port Range | Protocol | Purpose |
| 21115 | TCP | NAT type test and handshake |
| 21116 | TCP / UDP | ID registration, heartbeat, and UDP hole punching (core) |
| 21117 | TCP | Relay data forwarding |
| 21118 – 21119 | TCP | Web Client support (optional) |
2.2. OpenWrt Forwarding Configuration Guidelines
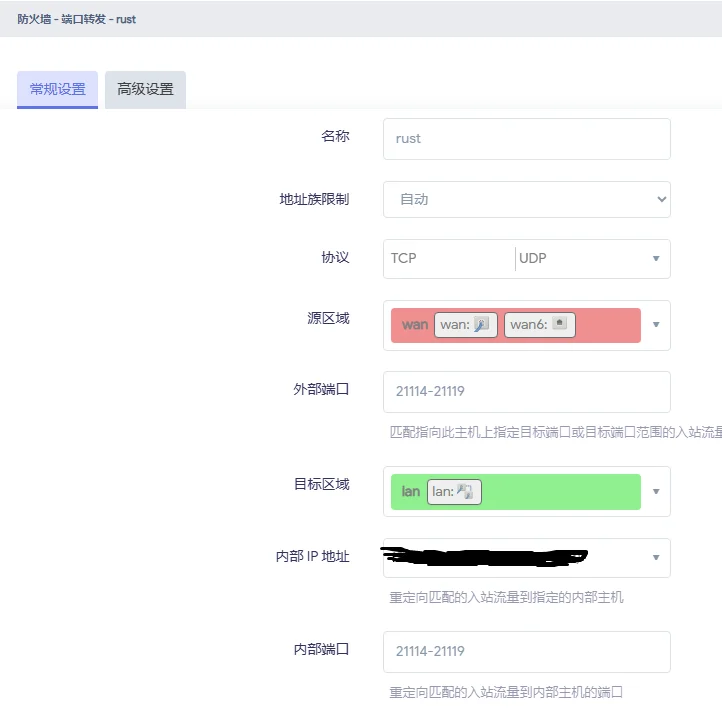
In OpenWrt, navigate to Network -> Firewall -> Port Forwards and add a new rule with the following settings:
- Name:
rustdesk - Protocol:
TCP + UDP - Source zone:
wan - External port:
21114-21119 - Destination zone:
lan - Internal IP address: Enter the internal IP of the server running Docker (e.g.,
192.168.0.7) - Internal port: Leave this blank (for 1:1 mapping) or enter
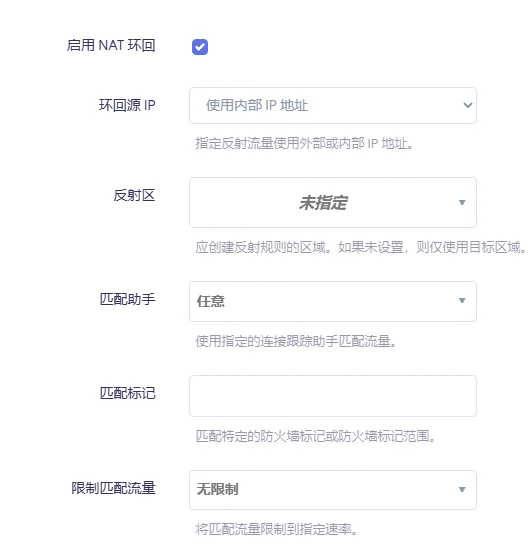
21114-21119 - Advanced Settings: Check Enable NAT Loopback (also known as Hairpin NAT)
3. Troubleshooting: External Connection Issues & Common Pitfalls
If your internal connections are working but external clients can’t establish a handshake, it’s often due to one of these two classic network architecture issues:
3.1. Asymmetric Routing Caused by Dual NICs on the Same Subnet
In ESXi / PVE virtualized environments, if a VM has both a passed-through physical NIC and a virtual NIC, and both are on the same subnet while each acquiring a default gateway:
- Failure Mechanism: External requests enter through the passed-through NIC, but the VM’s kernel, based on its routing table, sends reply packets out through the other DHCP-assigned NIC. This mismatch in source IPs triggers a firewall state table validation failure (RP_Filter), causing the connection to be dropped.
- Troubleshooting Command: Bash
ip route - Solution: Clean up redundant default routes. Edit your Netplan configuration file (
/etc/netplan/*.yaml), comment out the DHCP default route for the extraneous NIC, leaving only a single static gateway configuration. Then, executesudo netplan apply.
3.2. Enabling OpenWrt LAN Masquerading (SNAT)
If your internal network topology is complex, you can enable IP dynamic masquerading (Masquerading) for the lan zone in OpenWrt’s Network -> Firewall -> General Settings. When the router forwards external requests, it will masquerade the source address to the router’s internal IP, bypassing potential default gateway routing discrepancies on the target server.
4. Resolving “No Displays” Errors on Headless VMs
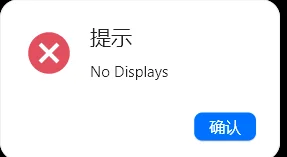
On Windows virtual machines or industrial PCs without a physical display, RustDesk may report “No Displays.” This typically happens because Windows’ native RDP monopolizes the virtual display channel, or the system lacks an active desktop rendering output.
4.1. Deploying the IddSampleDriver Virtual Display Driver
- Download an open-source virtual display driver source package (e.g.,
IddSampleDriver). - Create a folder named
IddSampleDriverin theC:\root directory, and place the configuration fileoption.txtinside it (used to define virtual screen resolutions, such as1920 1080 60). - Right-click and run
installCert.batas administrator to import the driver signing certificate. - Open Device Manager -> Action -> Add legacy hardware -> Install the hardware that I manually select from a list (Advanced) -> Have Disk…, then select
iddsampledriver.infto complete the installation.
4.2. Forcibly Reverting to the Physical Console
If you’ve previously used Windows’ built-in Remote Desktop (RDP), you must release desktop control by executing the following command in an administrator terminal before disconnecting to prevent the system from hanging:
DOS
tscon 1 /dest:console
5. Low-Latency & Image Quality Performance Tuning
For virtual machines without dedicated GPU hardware encoding units, adjust these settings for optimal smoothness:
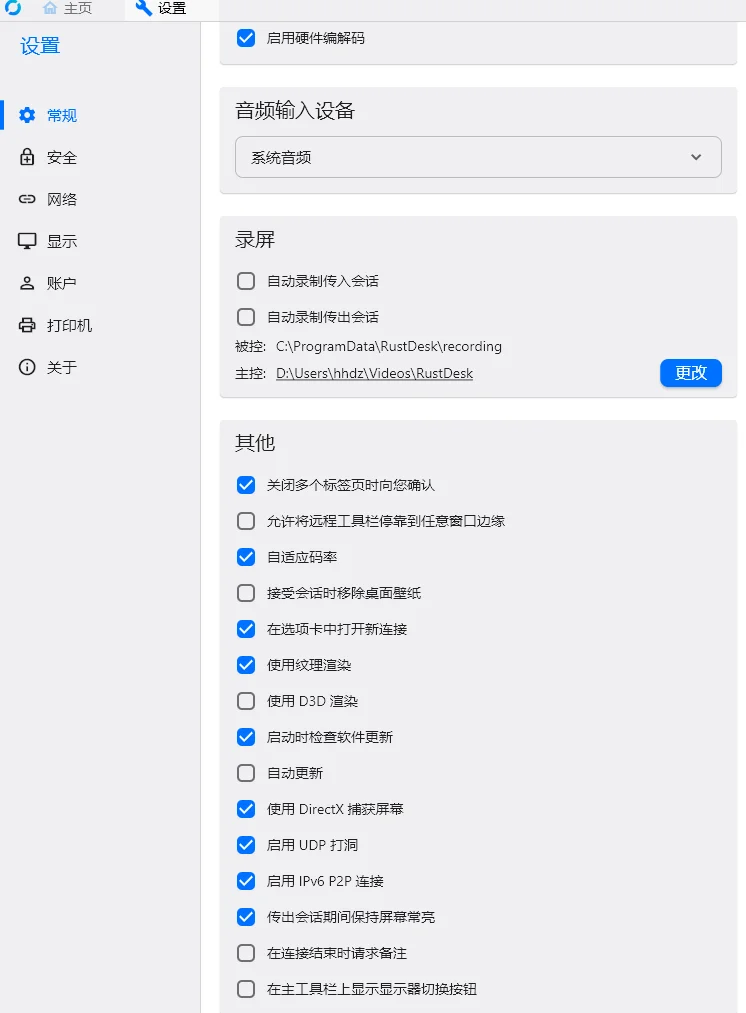
- Disable “Enable hardware codec” on the controlled client: When a dedicated GPU is absent, forcing hardware encoding can lead to frame drops and process deadlocks; disabling it and opting for CPU software decoding (VP9/AV1) provides a more stable experience.
- Keep “Enable UDP hole punching” and “IPv6 P2P” enabled: This allows clients to establish direct end-to-end connections between mobile 5G and home broadband, bypassing the bandwidth bottlenecks of relay forwarding.
- Enable “Remove desktop wallpaper”: Reduces redundant data transmission for static screens, lowering the encoding load.
- Limit 30 FPS on the controlling client: Setting the frame rate cap to 30 FPS and selecting “Balanced” image quality on the controlling client can significantly reduce the VM’s CPU utilization.
Frequently Asked Questions (FAQ)
How can I achieve a one-click, pre-configured RustDesk client installation?
The official Windows installer supports automatic configuration loading based on the filename. Rename the installer package to rustdesk-host=yourdomain.com,key=your_public_key.exe. Double-clicking it will then automatically pre-fill the server and public key details.
Will client upgrades reset my server configuration after creating a custom package?
No, your configuration will persist. RustDesk’s program logic and user configuration files are independent. Client server and public key information is stored in %APPDATA%\RustDesk\config\RustDesk2.toml, and upgrading to a new version will not overwrite this file.
Why does the client show “Connecting” for a long time or report network errors?
Please check the following in order: ① Does your DDNS domain accurately resolve to your current public IP? ② Is UDP protocol on port 21116 successfully forwarded on your router? ③ Is the server Docker container running correctly and are there any errors in its logs?