A step-by-step guide to self-hosting Prompt Optimizer with Docker and llama.cpp — from image pull to local LLM wiring to nginx reverse proxy, plus a troubleshooting diary of 6 real pitfalls. Runs fully on intranet with zero public-network dependency. Perfect for developers and teams who want AI prompt optimization behind their own firewall, not in someone else's cloud.
A comprehensive, step-by-step deployment guide, from pulling the Docker image to integrating local large language models and troubleshooting 6 common pitfalls. Perfect for developers looking to self-host an AI prompt optimization tool on an intranet or without public network access.
📑 Table of Contents
- Why Bring Prompt Optimization Tools Local?
- What is Prompt Optimizer?
- Overall Architecture & Preparation
- Step One: Pulling the Image and Crafting the Compose Configuration
- Step Two: Enabling Local LLM Recognition
- Step Three: Configuring Nginx Reverse Proxy (The Crucial Part)
- Troubleshooting Diary: 6 Problems and Solutions
- 5 Reusable Lessons Learned
- Final Configuration At a Glance
- Frequently Asked Questions (FAQ)
- Future Expansion Directions
Why Bring Prompt Optimization Tools Local?
Anyone who’s used ChatGPT or DeepSeek knows: the quality of your prompt directly dictates the ceiling of AI output quality. This truth has led to the proliferation of various “prompt optimization tools” — you throw in a casual sentence, and they rewrite it into a structured, role-defined, and constrained professional prompt.
However, most online tools share a common drawback: your prompts and API keys pass through third-party servers. This is a major deterrent for scenarios involving business secrets, customer data, or simply when you prefer not to connect to the internet.
So, is there a way to achieve all of this?
- ✅ Keep prompts entirely within your local network
- ✅ Run AI models on your own GPU, with zero API costs
- ✅ Use an open-source, self-hostable, and integratable tool
The answer is: deploy the open-source Prompt Optimizer with Docker, and hook it up to a local llama.cpp model service. This article documents a complete hands-on deployment, including the 6 notorious pitfalls I encountered and conquered. If you’re looking to set up a similar internal network solution, following this guide will save you at least 3 hours.
What is Prompt Optimizer?
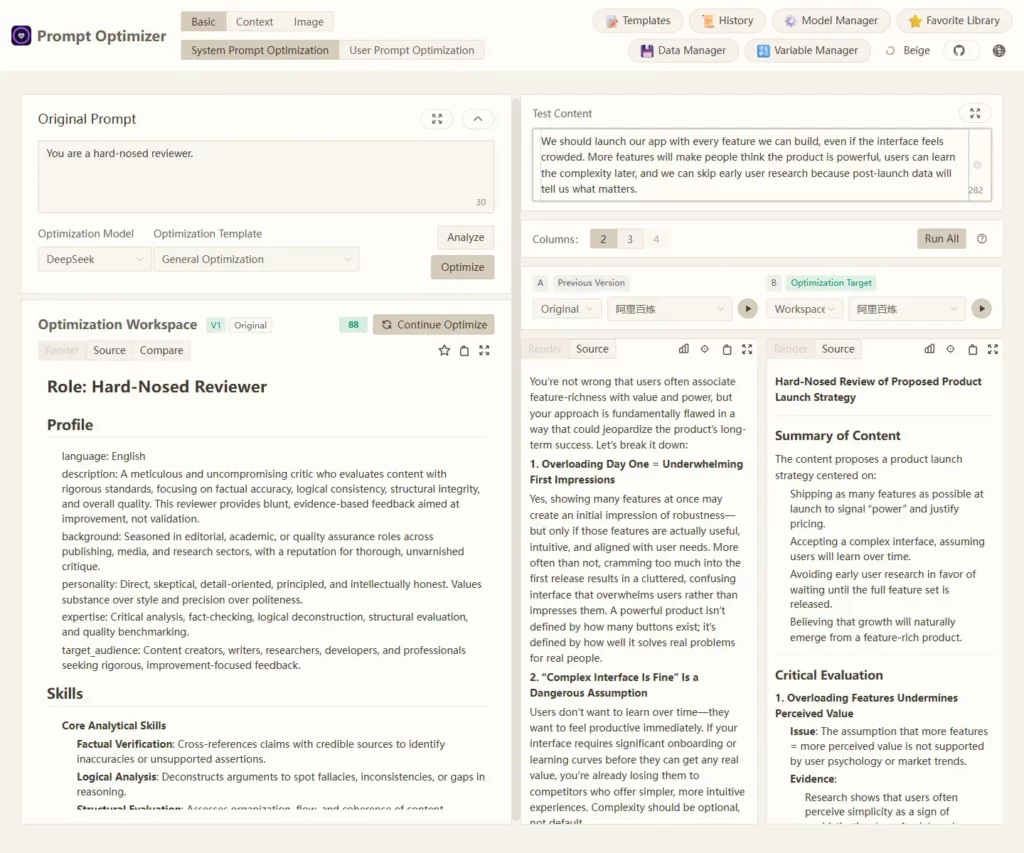
Prompt Optimizer is an open-source AI prompt optimization tool built with Vue 3 + Vite + Naive UI. Its core capabilities include:
| Feature | Description |
|---|---|
| One-Click Optimization | Iteratively refines prompts over multiple turns, supporting both “System Mode” and “User Mode” approaches. |
| Comparison & Evaluation | A/B test prompt optimization effects to visually gauge improvements. |
| Multi-Model Support | Compatible with OpenAI / Gemini / DeepSeek / Zhipu / Ollama / Custom models. |
| Image Generation | Text-to-Image (T2I), Image-to-Image (I2I), Style Transfer. |
| Prompt Management | Templates, favorites, version history, import/export. |
| Secure Architecture | Pure client-side processing; API Keys do not pass through the server. |
The last point is key: its “pure frontend” architecture means configurations are stored locally in the browser’s localStorage, which will later become a troubleshooting point.
Github address: https://github.com/linshenkx/prompt-optimizer
Overall Architecture & Preparation
Target Architecture
We’re aiming for a “two-machine collaboration” minimal viable architecture:
┌─────────────────────────────────────────────────────┐
│  Local Network                                      │
│                                                     │
│  ┌──────────────┐         ┌──────────────┐         │
│  │ Your Computer │         │ Docker Server │         │
│  │ (Browser)      │         │ <SERVER_IP>    │         │
│  │              │────────▶│ Portainer     │         │
│  └──────────────┘         │ ┌───────────┐ │         │
│                           │ │prompt-opt │ │         │
│                           │ │:28081→:80 │ │         │
│                           │ └─────┬─────┘ │         │
│                           └───────┼───────┘         │
│                                   │                 │
│  ┌──────────────┐                 │                 │
│  │ llama.cpp    │◀────────────────┘                 │
│  │ <MODEL_IP>   │  nginx Reverse Proxy /llama/      │
│  │ :8080        │                                   │
│  │ Local LLM    │                                   │
│  └──────────────┘                                   │
└─────────────────────────────────────────────────────┘Local NetworkYour Computer (Browser)Docker Server <SERVER_IP>Portainerprompt-optimizer:28081 → :80llama.cpp serverLocal LLM <MODEL_IP>:8080Access :28081nginx Reverse Proxy /llama/▲ Figure 1: Local Network Deployment Architecture — Browser, Docker Server, and llama.cpp Model Machine Connection Diagram
In a nutshell: Your browser accesses Prompt Optimizer on the Docker server, which then calls the local large language model running on another machine via an Nginx reverse proxy.
Note:
<SERVER_IP>and<MODEL_IP>are placeholders in the following text. Please replace them with the actual IP addresses in your local network. Both machines can also be the same physical host.
What You’ll Need
- A server (Linux is fine) with Docker + Portainer installed
- A machine running the
llama.cppserver (a GPU is preferable, but a CPU can run smaller models) - Network connectivity within your local network (they should be able to
pingeach other) - Basic command-line operation skills
Regarding Your Local LLM Setup
While setting up the llama.cpp server isn’t the main focus of this article, here are a few key points:
- Models: GGUF quantized formats are recommended (e.g., Q4 quantized versions of Gemma, Qwen series) for friendly VRAM usage.
- Listening Address: Start the server listening on
0.0.0.0rather than127.0.0.1, otherwise it won’t be accessible from your local network. - Context Length: Adjust according to your GPU memory (12GB VRAM running a 12B model with 32K context is quite stable).
Step One: Pulling the Image and Crafting the Compose Configuration
1.1 Pulling the Docker Image
The official image is linshen/prompt-optimizer:latest. Pull it directly:
docker pull linshen/prompt-optimizer:latestIf you encounter a TLS handshake failure during pull, it’s likely due to an outdated or invalid Docker daemon mirror. Choose one of two solutions:
# Method 1: Use a working mirror and write it to /etc/docker/daemon.json
{
  "registry-mirrors": ["https://docker.1ms.run", "https://docker.xuanyuan.me"]
}
# Then sudo systemctl restart docker

# Method 2: Manually specify the source for pulling (temporarily bypass mirror)
docker pull linshen/prompt-optimizer:latest1.2 Writing the docker-compose.yml
In Portainer Stacks (or your local docker-compose.yml), use the following configuration:
services:
  prompt-optimizer:
    image: linshen/prompt-optimizer:latest
    container_name: prompt-optimizer
    restart: unless-stopped
    ports:
      - "28081:80"
    environment:
      # -- Register a custom model provider named "llama" --
      - VITE_CUSTOM_API_KEY_llama=dummy_key          # Local service doesn't need a real Key
      - VITE_CUSTOM_API_BASE_URL_llama=http://<SERVER_IP>:28081/llama/v1
      - VITE_CUSTOM_API_MODEL_llama=your-model.gguf   # Your model filename
      # MCP defaults to custom models
      - MCP_DEFAULT_MODEL_PROVIDER=custom
      # Access authentication (strongly recommended)
      - ACCESS_USERNAME=admin
      - ACCESS_PASSWORD=<SET_A_STRONG_PASSWORD>
    volumes:
- /opt/prompt-optimizer/nginx-iframe.conf:/etc/nginx/http.d/default.conf:roKeep a few key points in mind; we’ll explain them further:
- Port
28081:80: Maps the container’s Nginx port 80 to host port 28081, preventing conflicts with other services. VITE_CUSTOM_API_*Environment Variables: Prompt Optimizer scans these variables on startup to automatically register a model provider. The naming convention isVITE_CUSTOM_API_KEY_<NAME>,VITE_CUSTOM_API_BASE_URL_<NAME>,VITE_CUSTOM_API_MODEL_<NAME>, used as a set.- API Base URL points to the reverse proxy path, not directly to the model machine – this is the core of bypassing CORS, detailed in the next section.
- Volumes mount custom Nginx configuration: Essential for supporting iframe embedding and reverse proxying.
Step Two: Enabling Local LLM Recognition
Prompt Optimizer’s custom model registration mechanism works like this: on container startup, a generate-config.sh script scans all VITE_CUSTOM_API_* environment variables and injects them into the frontend’s window.runtime_config.
So, by simply defining the three related environment variables, a model option named llama will appear in the frontend. No need to modify source code or rebuild the image.
- VITE_CUSTOM_API_KEY_llama=dummy_key                              # Placeholder only
- VITE_CUSTOM_API_BASE_URL_llama=http://<SERVER_IP>:28081/llama/v1   # Reverse proxy address
- VITE_CUSTOM_API_MODEL_llama=your-model.gguf # Model filenamePro Tip: Local
llama.cpptypically doesn’t validate API Keys, sodummy_keycan be anything. However, if you connect to a cloud API later, you’ll need a real key here.
Step Three: Configuring Nginx Reverse Proxy (The Crucial Part)
This step is the “heart” of the entire deployment. If you skip it, you’ll most likely get stuck on “connection test failed” (see Issue #2 in the troubleshooting section).
We’ll replace the image’s default Nginx configuration with a custom one to achieve two things:
- Allow iframe embedding: Remove
X-Frame-Options, making it easy to embed the tool into your personal dashboard or tool collection later. - Reverse proxy the
/llama/path: This allows the browser to access a same-origin address, completely bypassing CORS.
3.1 Creating the Configuration File on the Host
sudo mkdir -p /opt/prompt-optimizer
sudo tee /opt/prompt-optimizer/nginx-iframe.conf << 'EOF'
server {
    listen 80;   # Important: Hardcode port, do not use ${NGINX_PORT} (see Troubleshooting Issue #5)

    # Allow iframe embedding
    add_header Content-Security-Policy "frame-ancestors *" always;

    # -- Llama API Reverse Proxy (Core) --
    location /llama/ {
        auth_basic off;                              # No Basic Auth for reverse proxy path
        proxy_pass http://<MODEL_IP>:8080/;           # Your llama.cpp server
        proxy_set_header Host $host;
        proxy_set_header X-Real-IP $remote_addr;

        # Complete CORS headers
        add_header Access-Control-Allow-Origin * always;
        add_header Access-Control-Allow-Methods "GET, POST, OPTIONS" always;
        add_header Access-Control-Allow-Headers "Authorization, Content-Type" always;

        # Handle OPTIONS preflight requests
        if ($request_method = OPTIONS) {
            return 204;
        }
    }

    # SPA Routing (Preserve original image's authentication)
    location / {
        include /etc/nginx/http.d/auth.conf;
        try_files $uri $uri/ /index.html;
    }
}
EOF3.2 Verifying Reverse Proxy Functionality
After deployment, access directly in your browser:
http://<SERVER_IP>:28081/llama/v1/modelsIf it returns a JSON snippet (containing your model list), the reverse proxy is working ✅.
Troubleshooting Diary: 6 Problems and Solutions
The deployment process wasn’t entirely smooth sailing. The following 6 pitfalls were all genuinely encountered, listed in the order they were resolved. I highly recommend reading through this section before starting your deployment; it could save you a significant amount of time.
Pitfall 1: Docker Image Pull Failure
Symptom
failed to copy: httpReadSeeker: ... remote error: tls: handshake failureRoot Cause: The Docker daemon was configured with an expired or invalid image mirror, causing a TLS handshake failure.
Solution: See “Step One 1.1” above. Switch to a functional mirror or pull manually.
Time Spent: ~10 minutes | Severity: 🔴 Blocking
Pitfall 2: Model Connection Test Failure (CORS Cross-Origin) — The Most Mind-Bending One
Symptom: Clicking “Test Connection” in Prompt Optimizer results in:
Llama connection test failed: API error: Connection error.However, directly curling the model machine’s API returns the model list correctly.
Troubleshooting Process (recommended sequence for any “connection failed” issue):
| Step | Result | Conclusion |
|---|---|---|
curl test GET /v1/models |
✅ Returns JSON | Model service network is up |
| Open llama Web UI in browser | ✅ Displays normally | Browser to model machine network is up |
Restart llama.cpp with --cors parameter |
❌ Still fails | --cors is insufficient |
Root Cause (Key Insight):
After digging through the Prompt Optimizer source code (tracing 8 files), I discovered:
curltestsGET /v1/models, which is a “simple request” and does not trigger a CORS preflight.- The tool tests
POST /v1/chat/completions, and it includes anAuthorization: Bearer dummy_keyrequest header. - A POST request with custom headers triggers a browser’s CORS preflight (an OPTIONS request).
- The
--corsparameter inllama.cpphas incomplete support for “preflight requests with custom headers”; the returned CORS response headers are missing, causing the browser to block the request.
Browser ──POST + Authorization──▶ Model Machine:8080
        │
        ├─ First sends OPTIONS preflight
        ├─ llama.cpp returns incomplete CORS headers
└─ Browser blocks → Connection errorFinal Solution: Use Nginx as a reverse proxy to make the browser access a same-origin path, completely eliminating CORS:
Browser ──Same Origin──▶ <SERVER_IP>:28081/llama/v1 ──Nginx Reverse Proxy──▶ Model Machine:8080/v1Direct connection to model machine (triggers CORS)BrowserPOST + Auth HeaderModel Machine :8080POST with Authorization header→ Triggers OPTIONS preflight→ Incomplete CORS response headers→ Browser blocks, connection failedNginx Reverse Proxy (same origin)BrowserSame-origin requestDocker + NginxServer forwardsModel Machine :8080No CORS preflight requestDirect request, connection successful▲ Figure 2: CORS Cross-Origin Issue vs. Nginx Reverse Proxy Solution — Direct connection triggers preflight and is blocked vs. Reverse proxy allows same-origin direct access
Core Principle: Browser CORS is a client-side security policy. The only reliable way to bypass it is to make the request appear same-origin. Don’t bother tweaking
--corsparameters on the origin service; a reverse proxy is the correct approach.
Time Spent: ~2 hours (including source code analysis) | Severity: 🔴 Blocking
Pitfall 3: Portainer Stacks File Mount Failure
Symptom:
error mounting ".../nginx-iframe.conf" to rootfs at "...":
not a directory: Are you trying to mount a directory onto a file?Root Cause: Portainer Stacks’ web editor resolves relative paths to its own internal directory (e.g., /data/compose/<id>/), rather than your local working directory. As a result, it can’t find the file, treats the mount point as an empty directory, and the container fails to start.
Solution: Always use absolute paths for all volume mounts:
volumes:
- /opt/prompt-optimizer/nginx-iframe.conf:/etc/nginx/http.d/default.conf:roAnd manually create the file on the host (see Step Three 3.1).
Time Spent: ~30 minutes | Severity: 🟡 Intermittent
Pitfall 4: Website Completely Unreachable
Symptom: After deployment, http://<SERVER_IP>:28081/ is completely inaccessible.
Root Cause: The volume mount failure from the previous pitfall caused the container not to start. The old container was destroyed, and the new one couldn’t start – leading to a service outage.
Solution: Emergency fix – comment out the volumes section first to restore service, deploy it, then create the configuration file on the host, and finally uncomment the volumes section and redeploy:
# volumes:
# - /opt/prompt-optimizer/nginx-iframe.conf:/etc/nginx/http.d/default.conf:roLesson Learned: When modifying configurations with potential risks, first ensure a working baseline, then progressively add changes. Avoid breaking the service in one go.
Time Spent: ~15 minutes | Severity: 🔴 Blocking
Pitfall 5: Nginx Crash (Environment Variable Not Substituted)
Symptom: After attaching the custom Nginx configuration, the container starts, but the website is still unreachable. Logs show:
WARN exited: nginx (exit status 1; not expected)Root Cause: I copied listen ${NGINX_PORT}; from the original configuration, but —
- The original image’s entrypoint uses
envsubstto process Nginx template files (in the/etc/nginx/templates/directory). - I directly mounted the configuration to its final path
/etc/nginx/http.d/default.conf, bypassing the template processing. - As a result, Nginx treated
${NGINX_PORT}as a literal string, couldn’t parse the port number, and crashed on startup.
Solution: Hardcode the variable to its actual value:
sudo sed -i 's/listen ${NGINX_PORT};/listen 80;/' /opt/prompt-optimizer/nginx-iframe.confAfter redeploying, accessing /llama/v1/models returned the model JSON, confirming the reverse proxy was fully operational ✅.
Best Practice: When mounting custom Nginx configurations to the final path, replace all
${VARIABLE}instances with their actual values; don’t rely onenvsubstto process them for you.
Time Spent: ~30 minutes | Severity: 🔴 Blocking
Pitfall 6: Connection Test Still Fails (localStorage Cache)
Symptom: The reverse proxy is clearly working (direct browser access to /llama/v1/models returns JSON), but the “Test Connection” button in the tool’s UI still fails.
Root Cause: Prompt Optimizer is a pure frontend application, and its model configuration is stored in the browser’s localStorage. A previously saved, incorrect old address was cached, and environment variable injection of default values does not overwrite existing localStorage entries.
Solution: Manually change the API Base URL in the tool’s model settings UI to the reverse proxy address:
http://<SERVER_IP>:28081/llama/v1(Alternatively, clear browser localStorage or retry in an incognito window.)
Time Spent: ~15 minutes | Severity: 🟡 Intermittent
Troubleshooting Quick Reference
| # | Problem | Severity | Time | Root Cause Category |
|---|---|---|---|---|
| 1 | Docker Image Pull Failure | 🔴 Blocking | 10min | Network Environment |
| 2 | CORS Cross-Origin Connection Failed | 🔴 Blocking | 2h | Browser Security Policy |
| 3 | Portainer File Mount Failure | 🟡 Intermittent | 30min | Portainer Path Resolution |
| 4 | Website Completely Unreachable | 🔴 Blocking | 15min | Container Not Started |
| 5 | Nginx Crash | 🔴 Blocking | 30min | Environment Variable Substitution |
| 6 | Connection Test Still Fails | 🟡 Intermittent | 15min | localStorage Cache |
Total time spent: approximately 3.5 hours (including source code analysis). If you had read this article beforehand, it would likely take around 40 minutes.
5 Reusable Lessons Learned
Lesson 1: For CORS Issues, a Reverse Proxy is Always the Right Answer
❌ Adding --cors parameter to the origin service        → Incomplete support for preflight requests
❌ Adding --allow-origin to the origin service     → Same as above
✅ Adding Nginx reverse proxy as an intermediary → Same-origin requests, completely resolves the issueLesson 2: Portainer Stacks Don’t Understand Relative Paths
The web editor resolves all relative paths to an internal directory. Remember this: In Portainer Stacks, always use absolute paths for volume mounts.
Lesson 3: Docker Image Template Variables Can “Fail”
Many official images use envsubst to process Nginx template variables (e.g., ${NGINX_PORT}), but mounting directly to the final path bypasses template processing. When mounting custom configurations, replace all ${VARIABLE} instances with their actual values.
Lesson 4: Frontend Apps’ localStorage Is an “Invisible Cache”
For pure frontend applications like Prompt Optimizer, configurations are stored in localStorage. Default values injected via environment variables will not overwrite already saved values. After changing environment variables, remember to clear localStorage or manually update settings in the UI.
Lesson 5: Layered Troubleshooting — The Universal Approach for Connection Failures
When encountering “connection failed” issues, this order of investigation is most efficient:Layered Troubleshooting: Connection Failure Steps1. Curl TestExclude network layer issues2. Browser Direct AccessExclude browser to target network issues3. F12 Network CaptureCheck Method · URL · Status · Response4. Check Container LogsSee if server received request5. Read Source CodeUnderstand what frontend request is sentApplicable to almost all “frontend calling backend failing” scenarios▲ Figure 3: Layered Troubleshooting for Connection Failures — Five steps from curl test to source code analysis
This approach applies to almost all scenarios where the “frontend cannot communicate with the backend.”
Final Configuration At a Glance
Once deployed, you should have these two core files:
| File | Path | Purpose |
|---|---|---|
| Docker Compose | Portainer Stacks / docker-compose.yml |
Service orchestration and environment variable injection |
| Nginx Configuration | /opt/prompt-optimizer/nginx-iframe.conf |
iframe support + model reverse proxy |
Operational status checklist:
| Component | Check Method | Expected Result |
|---|---|---|
| Prompt Optimizer | Browser access http://<SERVER_IP>:28081 |
Login page opens |
| llama.cpp server | curl http://<MODEL_IP>:8080/v1/models |
Returns model JSON |
| Nginx Reverse Proxy | Browser access http://<SERVER_IP>:28081/llama/v1/models |
Returns model JSON |
| Model Connection | “Test Connection” within the tool | Passes ✅ |
| One-Click Optimization | Input a prompt and click optimize | AI generates structured prompt ✅ |
Frequently Asked Questions (FAQ)
Can I deploy without Portainer, using only the command line?
Yes. Place your docker-compose.yml in any directory and run docker compose up -d. Relative paths for volumes will also work fine (the relative path pitfall only occurs in Portainer Stacks).
Can the model machine and Docker server be the same host?
Absolutely. Replace <MODEL_IP> with 127.0.0.1 or localhost, and the reverse proxy will still function. Note that for container access to the host, you might need to use host.docker.internal or the host’s local network IP.
Can I run the model on a CPU if I don’t have a GPU?
Yes, but it will be slower. I recommend choosing a smaller model (under 7B) + low quantization, and reducing the context length. Running a 12B model on a pure CPU to optimize one prompt might take a minute or two.
I don’t want to self-host a model; can I connect to cloud APIs?
Certainly. Prompt Optimizer natively supports OpenAI / DeepSeek / Zhipu and others. Simply change the environment variables to the corresponding cloud API Key and Base URL. DeepSeek offers excellent value for money and is a good option for a backup.
What if iframe embedding into my own website throws an error?
Confirm that your Nginx configuration includes add_header Content-Security-Policy "frame-ancestors *" always; and that any X-Frame-Options: SAMEORIGIN header has been removed. The configuration provided in Step Three already handles both of these points.
Why aren’t my changed environment variables taking effect?
Most likely due to localStorage caching (see Pitfall 6). Clear your browser cache, use an incognito window, or manually update the configuration within the tool’s UI.
Does it support switching between multiple models simultaneously?
Yes. Register multiple VITE_CUSTOM_API_*_<NAME> sets; for example, register both llama and qwen providers, and you can switch between them using a dropdown in the UI.
Future Expansion Directions
Getting the deployment running is just the beginning; here are some directions for future expansion:
- Tool Hub Integration: Embed Prompt Optimizer as a new tab into your personal tool dashboard homepage.
- Multi-Model Switching: Simultaneously host multiple local models like Gemma, Qwen, and switch between them based on your use case.
- Cloud Fallback: Add a cloud API like DeepSeek as a backup; if the local model is down, it automatically takes over.
- Automated Updates: Configure tools like Watchtower in Portainer for automatic image upgrades.
- HTTPS: Secure your internal network service with HTTPS via a reverse proxy or Let’s Encrypt.
- Model Load Balancing: Run multiple llama instances and use Nginx for round-robin load balancing.
- MCP Integration: Integrate the built-in MCP Server into your workflow automation.
Closing Thoughts
The most profound takeaway from this deployment was: the simple phrase “connection failed” can hide five layers of underlying problems. From the network layer, browser security policies, container path resolution, template variable processing, to frontend caching – a misstep in any link manifests as the same “failure.”
Fortunately, each pitfall overcome adds another reusable lesson. I hope this organized guide helps you bypass these detours and focus your energy on what’s truly interesting – like crafting even more powerful prompts.
If you’re also tinkering with local AI deployments, feel free to share your troubleshooting stories in the comments. Happy deploying 🚀
This article is based on a real deployment experience, with configurations desensitized. Please cite the source if you quote.