A Dell PowerEdge R730 running ESXi 8.0 U2 had a dying 3TB SAS drive with two VMs still on it, while the NAS, Docker host, and router VMs on the same box had to keep running. This post walks through the full move: confirming the new drive in iDRAC, cloning with vmkfstools thin provisioning, switching disks, tracking down a ghost VM registration and a symlink trap, safely pulling the drive, and then fixing Windows 10 disk 100% while idle.
An old SAS drive in the server was on its way out, with two virtual machines still running on it. The same host also runs the NAS, a Docker host, and the router, and none of them could go down for a day. So the question was: how do you move the VMs off the dying drive and physically pull it, without stopping anything else? This is the full field log, on a Dell PowerEdge R730 running VMware ESXi 8.0 U2. Every step below was actually run, and every trap is one I walked into.
A note on the screenshots: hostnames, disk NAA IDs, and volume UUIDs are blacked out. Datastore and VM names are left as-is.
The setup
First, the inventory. The host is a Dell R730 on ESXi 8.0 U2. Storage is split across several volumes. The drive to retire is the old 3TB SAS disk SAS3T in slot 3, and the replacement New3T is already sitting in slot 7.
| Datastore | Disk | Slot | Purpose |
|---|---|---|---|
SAS3T | 3TB SAS, old (ST33000650SS) | Slot 3 | To be retired |
New3T | 3TB, new | Slot 7 | Receives win10 and the ubuntu-ai data disk |
512ssd | 512GB SSD | — | ubuntu-ai system disk already lives here |
3TRAID5, 8T | — | — | NAS VM data disks |
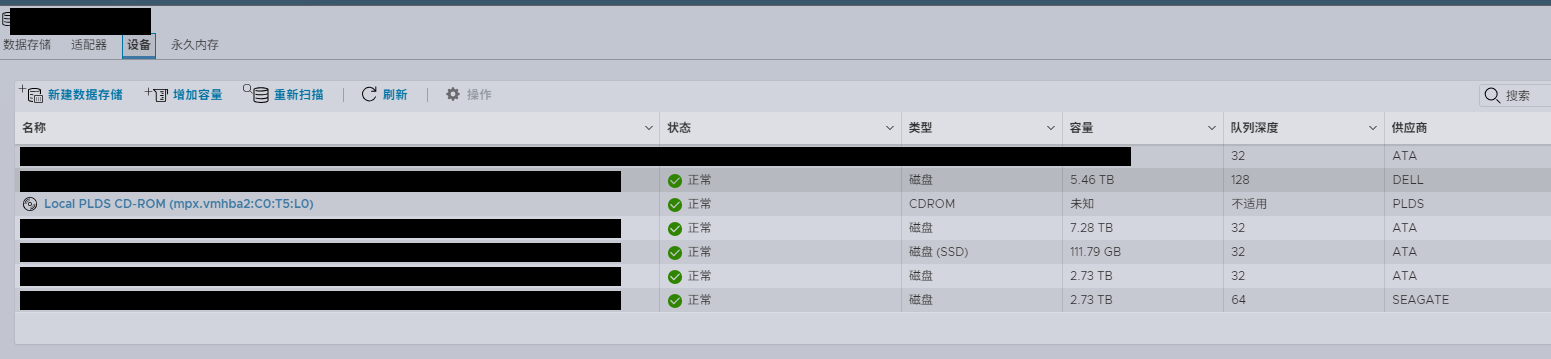
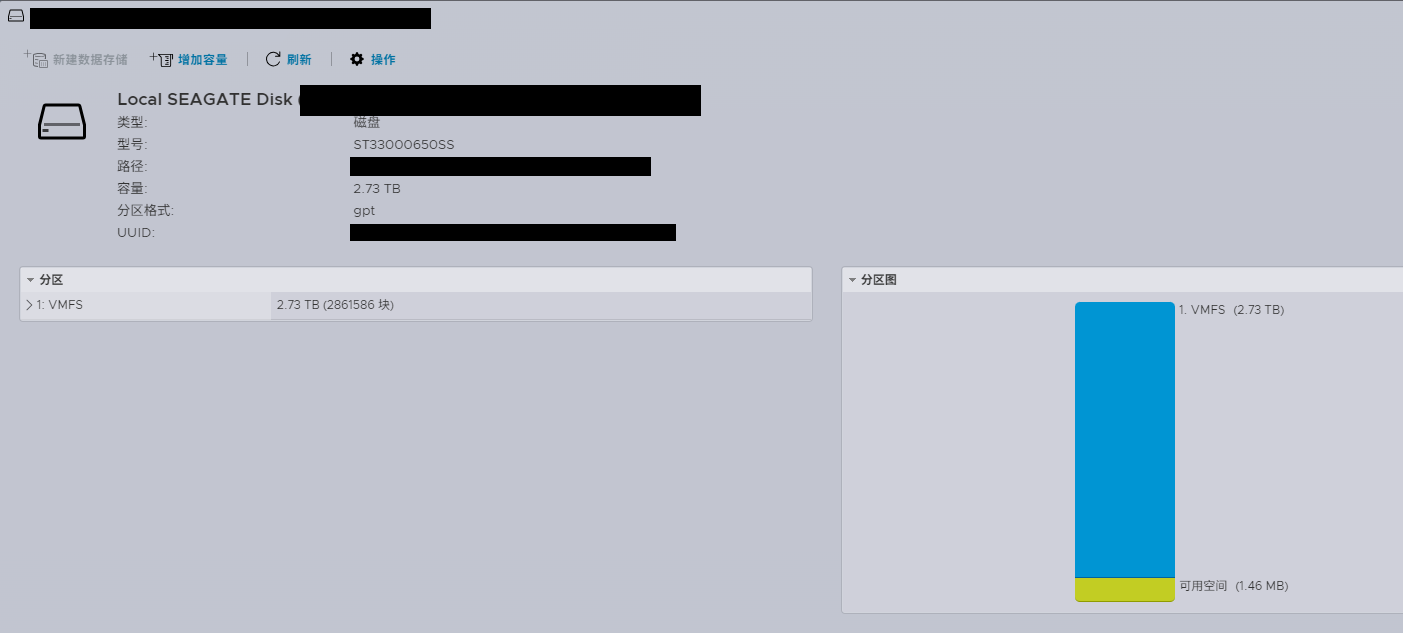
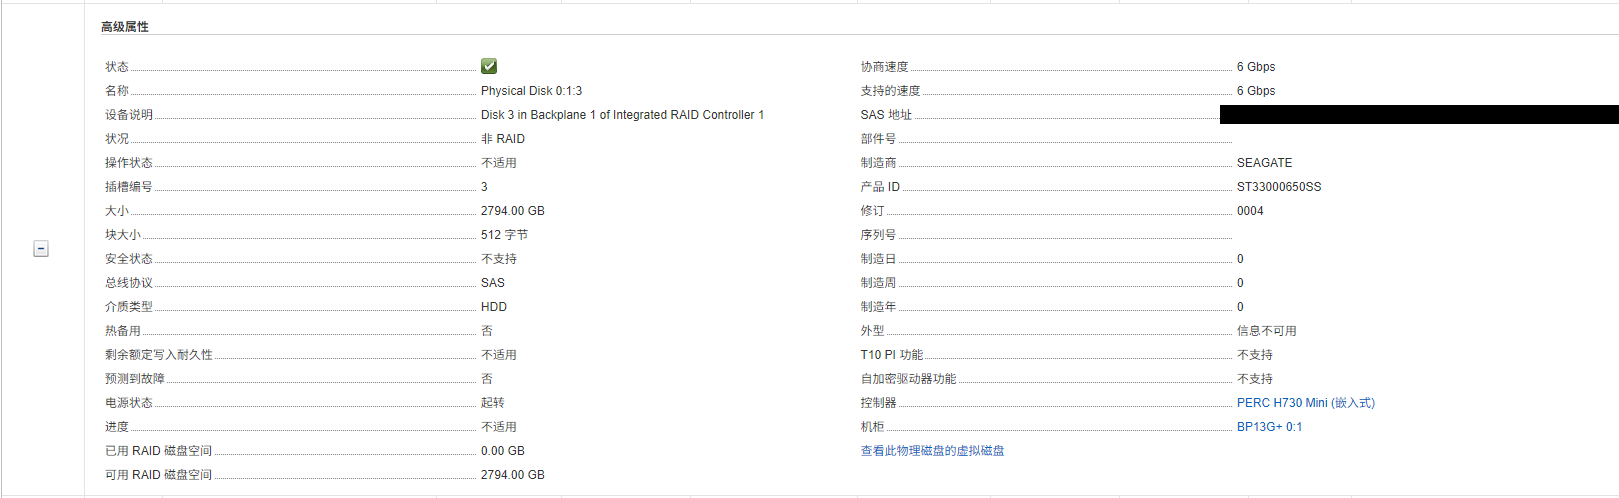
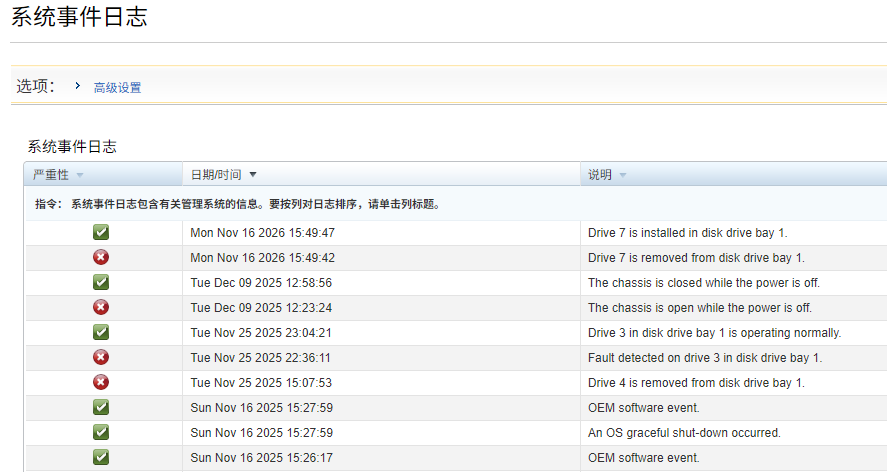
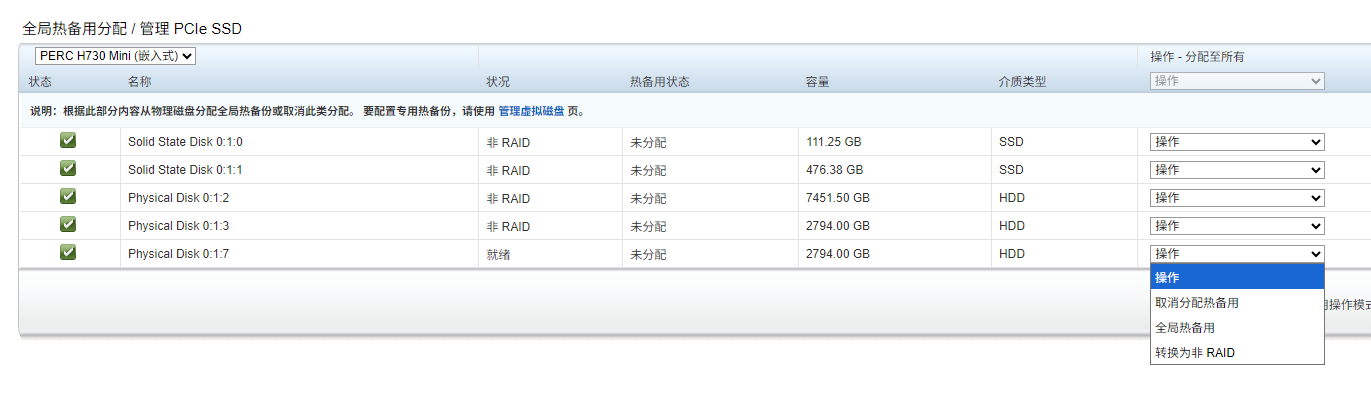
The old drive was worse than expected: a 2.73TB VMFS volume with only 1.46MB free. iDRAC agrees on the physical side — slot 3 is the Seagate ST33000650SS, 2794GB, SAS 6Gbps, non-RAID.
The two VMs to move:
- win10 (80GB virtual disk): move the whole VM from
SAS3TtoNew3T. - ubuntu-ai (24 vCPUs, 48GB RAM): its 150GB system disk is already on
512ssd; only the 1024GB data disk and the VM’s home configuration need to leaveSAS3T.
One constraint for the whole job: nothing else on the host stops. NAS, Docker, router — all stay up.
New drive first: confirm it in iDRAC
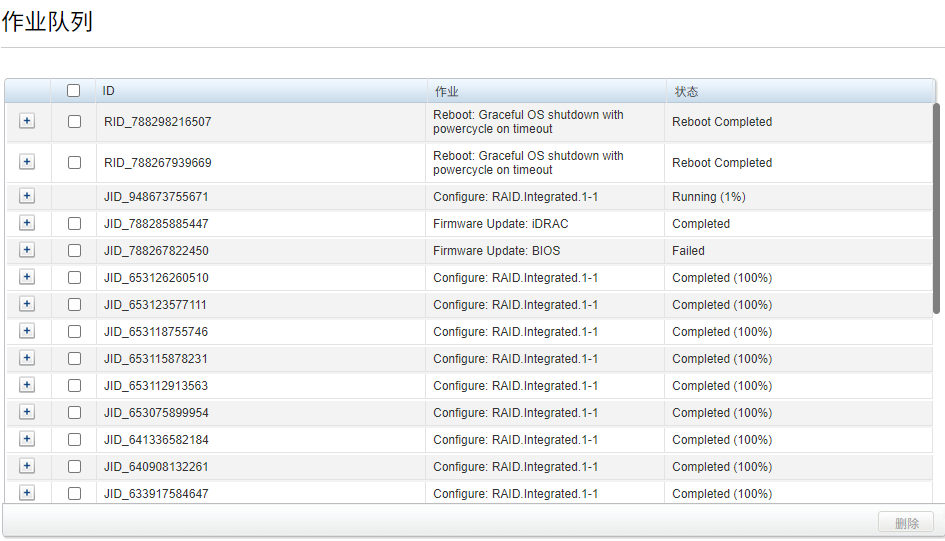
The new drive is in slot 7. Before creating anything in ESXi, check three things in iDRAC: the event log should show Drive 7 installed; the job queue should show the RAID configuration job finished; and the physical disk list should show the new drive healthy. Do those three checks first and the rest of the job has half as many surprises.
Stage 1: Clone with vmkfstools thin, skip the browser copy
The browser copy gets stuck, and Cancel is greyed out
The first instinct is to copy the .vmdk in the ESXi web datastore browser. For a 1TB disk, that stalls at 12 percent and basically stops. The browser copy does not skip empty blocks, so it is extremely slow — and worse, the cancel button in the task list is greyed out by default, so you cannot even stop it.
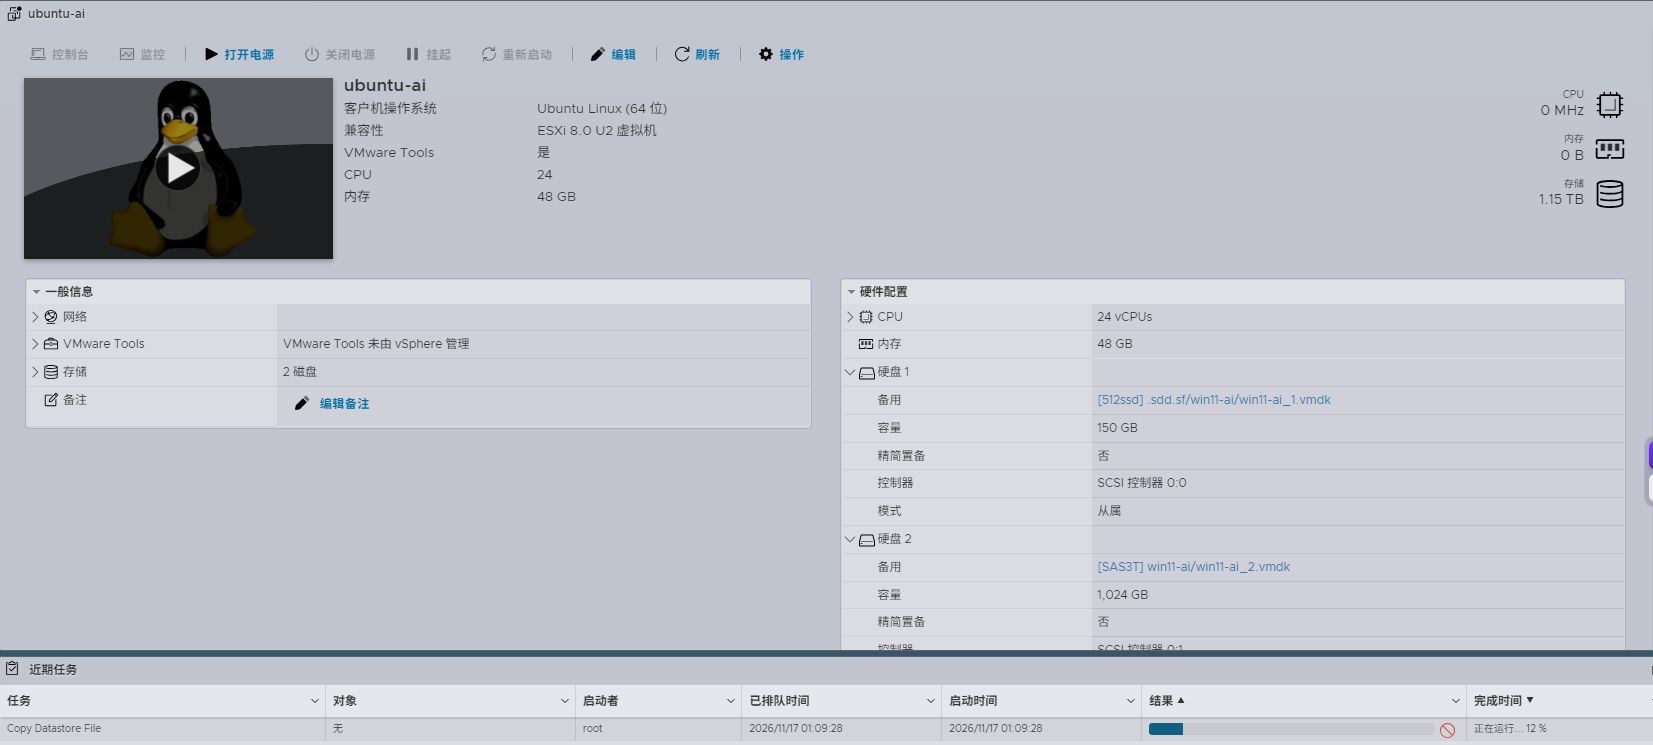
The fix is SSH: restart the hostd management agent to release the file lock. Restarting hostd does not restart the host, and the running NAS, Docker, and other VMs are completely unaffected. Enable SSH at Host → Actions → Services → Enable Secure Shell (SSH).
/etc/init.d/hostd restartClone with vmkfstools -d thin
Clear the half-copied leftovers from New3T, then use the native vmkfstools -i ... -d thin clone. Thin provisioning skips unused empty blocks and only copies real data — this nominally 1024GB disk only holds 684.53GB, so the thin clone saves a lot of time.
# Clean up leftovers and create the target directory
rm -rf /vmfs/volumes/New3T/vm-ai
mkdir -p /vmfs/volumes/New3T/vm-ai

# Copy the VM metadata files
cp /vmfs/volumes/SAS3T/vm-ai/*.vmx /vmfs/volumes/SAS3T/vm-ai/*.nvram /vmfs/volumes/SAS3T/vm-ai/*.vmsd /vmfs/volumes/New3T/vm-ai/ 2>/dev/null

# Thin-provisioned clone of the 1TB data disk
vmkfstools -i /vmfs/volumes/SAS3T/vm-ai/vm-ai_2.vmdk -d thin /vmfs/volumes/New3T/vm-ai/vm-ai_2.vmdkThe win10 80GB system disk gets the same treatment, cloned to [New3T] win10/win10.vmdk.
Stage 2: Switch disks and verify boot
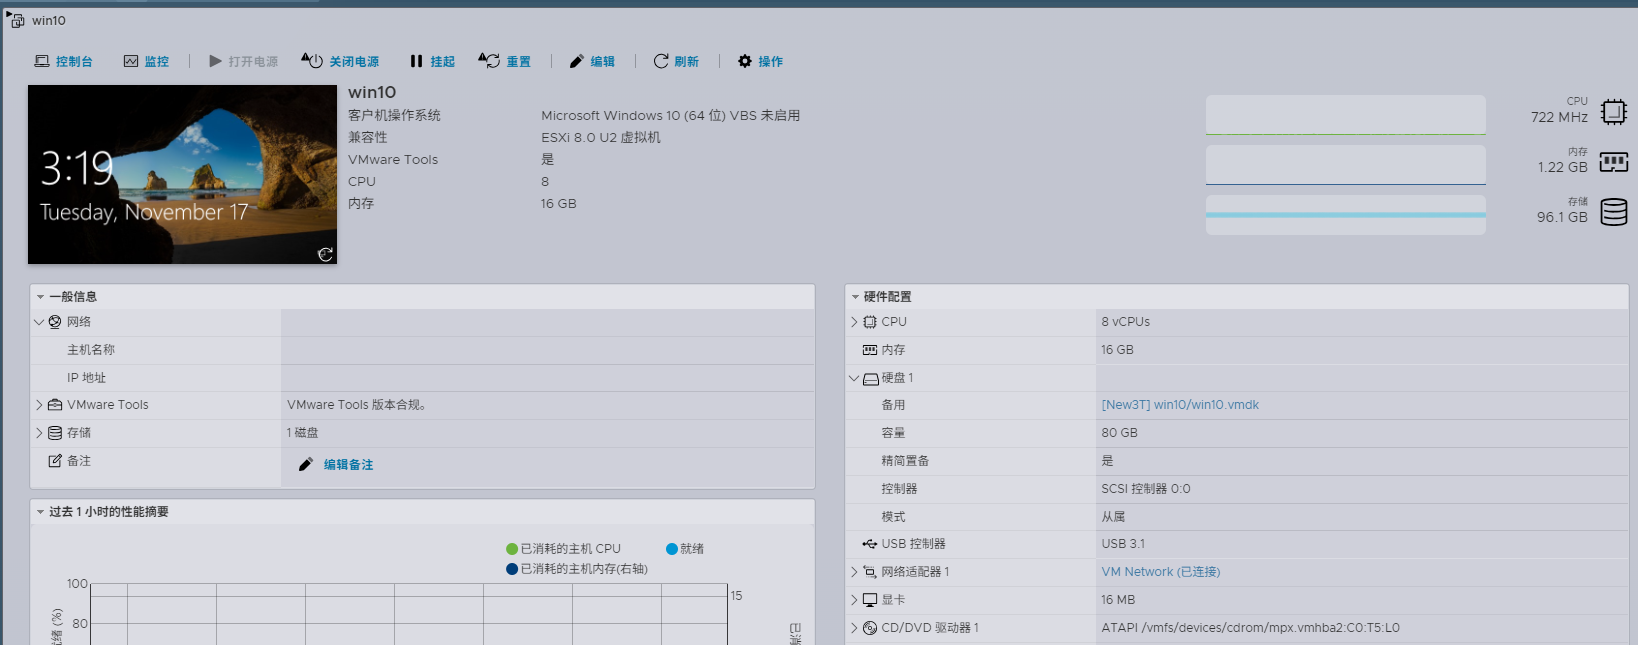
With the disks cloned, switch them over. Start with win10. After re-registering and powering on, check four things — all four must pass before the migration counts as done:
- The console boots into the Windows 10 desktop, and VMware Tools reports its version as compliant.
- Hard disk 1 clearly points to
[New3T] win10/win10.vmdk, thin provisioned: Yes. - CD/DVD drive 1 points at the host physical device, with no ISO mounted from
SAS3T. - The network adapter is connected and has a LAN IP.
Trap: do not switch the boot disk controller straight to PVSCSI
While I was at it, I tried to improve win10 disk performance by switching the boot disk’s SCSI controller 0 from LSI Logic SAS to VMware Paravirtual (PVSCSI) in the VM settings. On reboot, Windows blue-screened straight into the Choose an option / Troubleshoot recovery screen. The reason: Windows does not load the PVSCSI driver during boot, so it cannot find the system disk.
Quick recovery: power off → Edit Settings → change SCSI controller 0 back to LSI Logic SAS → save and power on, and it boots immediately. If you really want PVSCSI, the correct way is to attach a temporary PVSCSI secondary disk first while the system is running normally, let Windows load the driver, and only then switch the boot disk controller.
Switching the ubuntu-ai 1024GB data disk
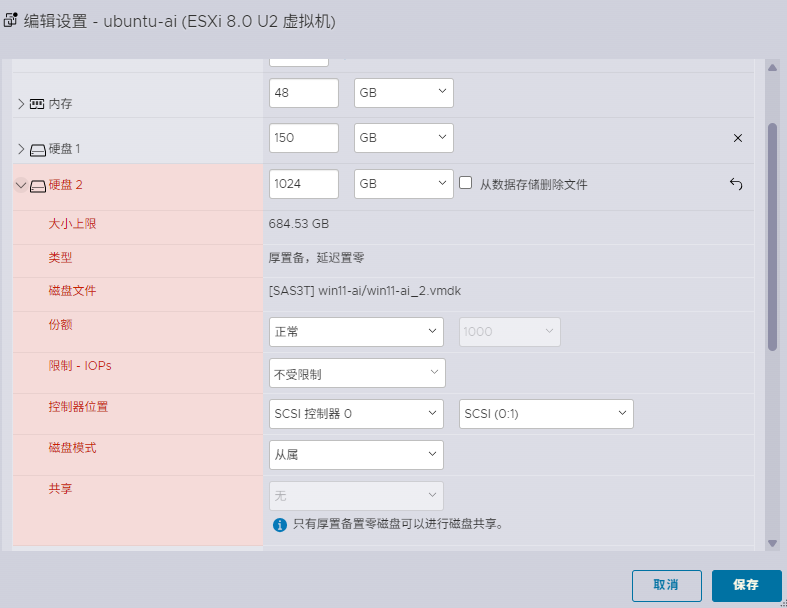
Power off, click Edit, and swap the disk in this order:
- Click the remove button on Hard disk 2 (
[SAS3T] vm-ai/vm-ai_2.vmdk), and make sure “Delete files from datastore” stays unchecked — the old disk data stays as a cold backup. - Click “Add hard disk → Existing hard disk” and select
[New3T] vm-ai/vm-ai_2.vmdk. - Keep the controller position exactly as it was, SCSI controller 0 / SCSI (0:1), so the device name inside Ubuntu (
/dev/sdb) and the/datamount point do not change at all. It boots and just works.
Stage 3: The ghost lock and the symlink trap
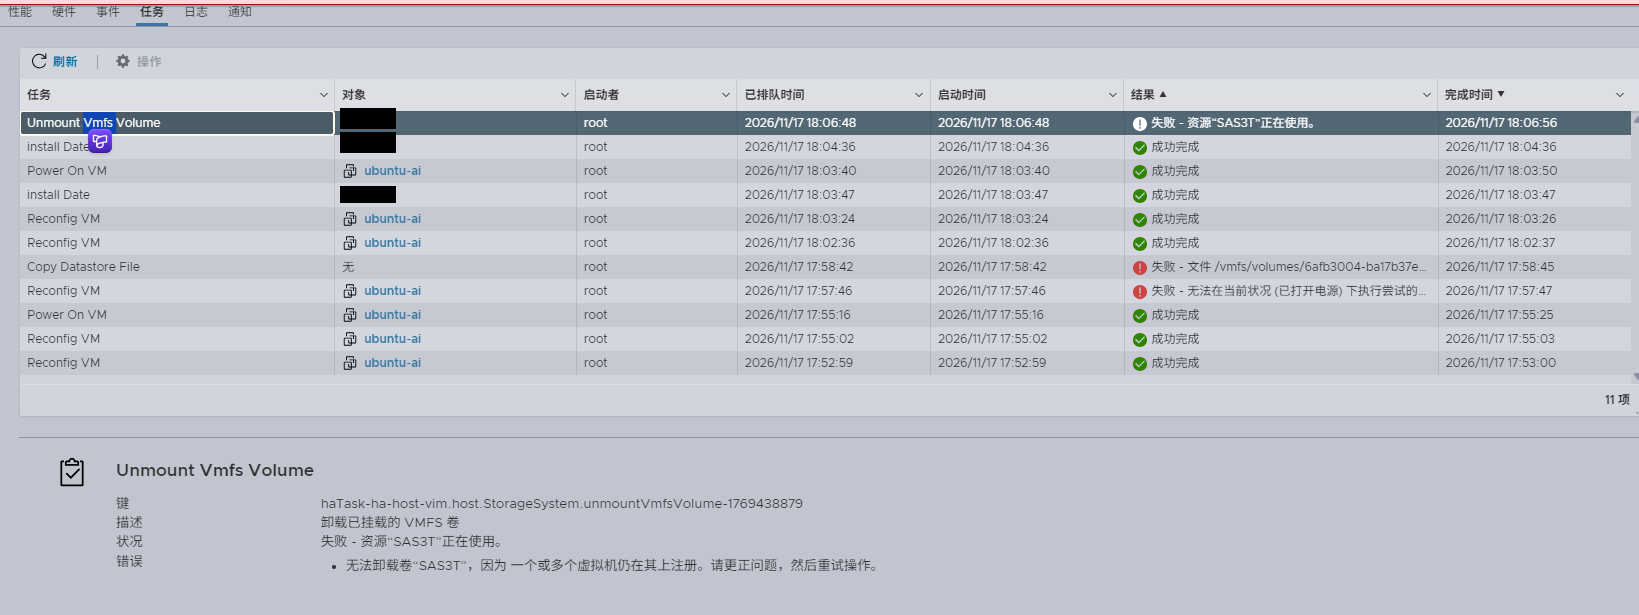
Both VMs were off SAS3T, so I went to Storage → Datastores, right-clicked SAS3T, and hit Unmount. ESXi refused: Failed – Resource “SAS3T” is in use. Cannot unmount volume “SAS3T” because one or more virtual machines are registered on it. The datastore details still showed “Virtual machines: 1”, but the VM list had no duplicate registrations, and no VM’s hardware showed a disk or CD drive on SAS3T.
1. Find the hidden registration with grep and lsof
The web UI could not see it, so I went to the SSH layer. Replace <SAS3T_UUID> with the actual volume UUID from the datastore details page, grep every .vmx for it, and check live file handles with lsof:
grep -rn "SAS3T\|" /vmfs/volumes/*/*/*.vmx
lsof | grep ""
That found it: even though ubuntu-ai’s two virtual disks were on 512ssd and New3T, the VM itself was still registered on SAS3T — its vm-ai.vmx, .nvram, and runtime logs all lived there. The .vmx also still contained a swap file path pointing at SAS3T (sched.swap.derivedName) and a reference to the old OS install ISO (sata0:0.fileName).
2. cp fails with Path does not exist: a directory symlink trap
After powering off, I tried copying .vmx and .nvram to /vmfs/volumes/512ssd/vm-ai/ and got Path does not exist over and over. It turned out /vmfs/volumes/512ssd/vm-ai was a symbolic link pointing at /vmfs/volumes/SAS3T/vm-ai, so the copy was overwriting itself. The fix is to remove the link and create a real directory first:
# 1. Remove the symlink to SAS3T (no trailing slash), create a real directory
rm -f /vmfs/volumes/512ssd/vm-ai
mkdir -p /vmfs/volumes/512ssd/vm-ai
# 2. Copy the config files and verify the directory is real (ls -ld starts with d)
cp /vmfs/volumes/SAS3T/vm-ai/vm-ai.vmx /vmfs/volumes/SAS3T/vm-ai/vm-ai.nvram /vmfs/volumes/512ssd/vm-ai/
ls -ld /vmfs/volumes/512ssd/vm-ai
# 3. Strip leftover SAS3T references from both .vmx files
sed -i '//d;/SAS3T/d' /vmfs/volumes/512ssd/vm-ai/vm-ai.vmx
sed -i '//d;/SAS3T/d' /vmfs/volumes/New3T/win10/win10.vmx
Then, in the ESXi web UI, right-click the old ubuntu-ai and choose Unregister (not Delete), and re-register it from 512ssd over SSH:
vim-cmd solo/registervm /vmfs/volumes/512ssd/vm-ai/vm-ai.vmx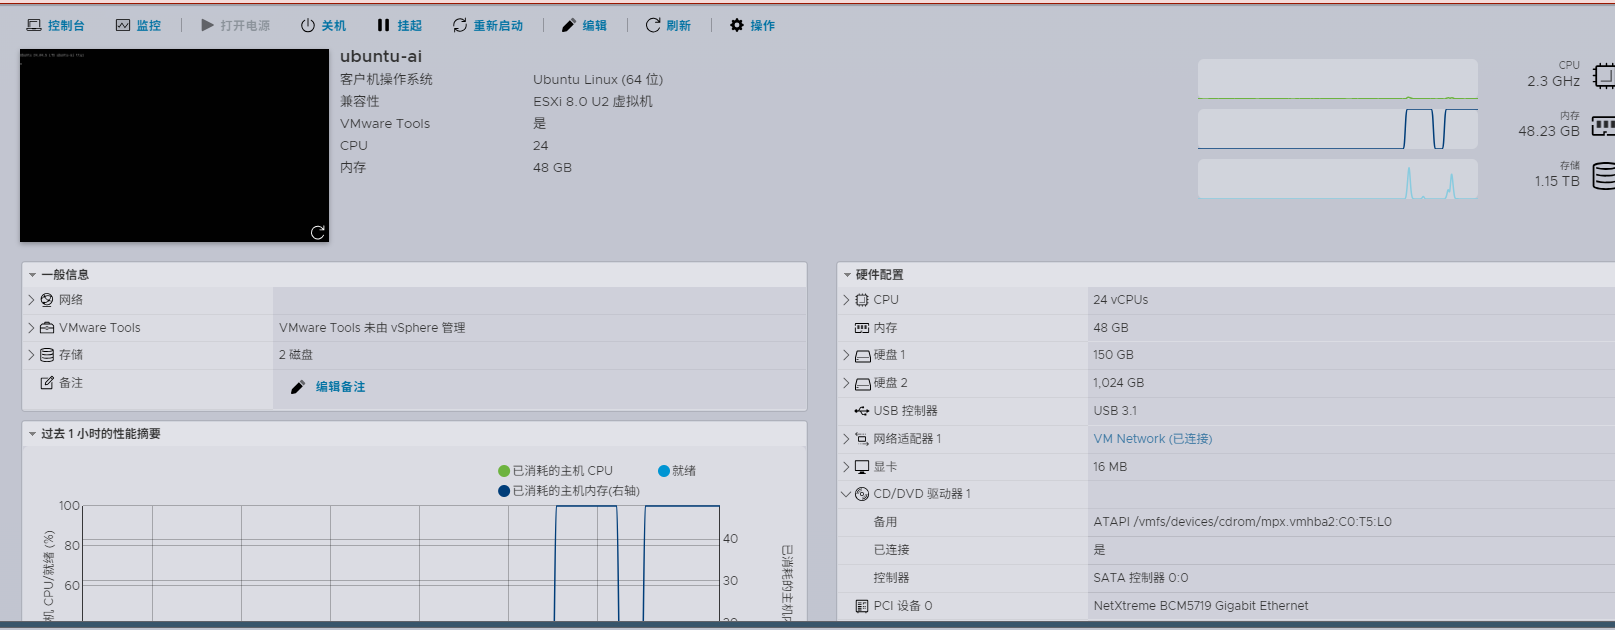
Stage 4: Unmount, detach, and pull the drive
After re-registering, Storage → Datastores → right-click SAS3T → Unmount finally worked. The SAS3T icon went grey and offline, capacity showing 0 B.
Standalone ESXi has no Detach button
Go to Storage → Devices, select the old SAS disk, and you will find the standalone ESXi 8.0 Host Client only offers “Edit partition” and “Clear partition table” in the Actions menu — there is no Detach button like vCenter has. Use esxcli instead to take the device offline:
# Take the physical device offline (detached)
esxcli storage core device set --state=off -d naa.5000c500xxxxxxxx

# Verify the state is off
esxcli storage core device list -d naa.5000c500xxxxxxxx | grep StatusRefresh the device list and the old drive shows as greyed-out “Unknown” — ESXi has fully cut communication with it.
Pulling the drive: 2 cm out, wait 30 seconds
At the front of the server, find the right slot, press the caddy release, pull the handle, and slide the drive out about 2 cm. Wait 30 seconds for the platters to spin down completely, then pull it all the way out. After removal, the disk disappears from the device list on its own.
If the datastore list still keeps a greyed-out SAS3T entry after the pull, remove the offline record over SSH and restart hostd to refresh the UI — and remember to disable SSH in the web UI when you are done:
esxcli storage core device detached remove -d naa.5000c500xxxxxxxx
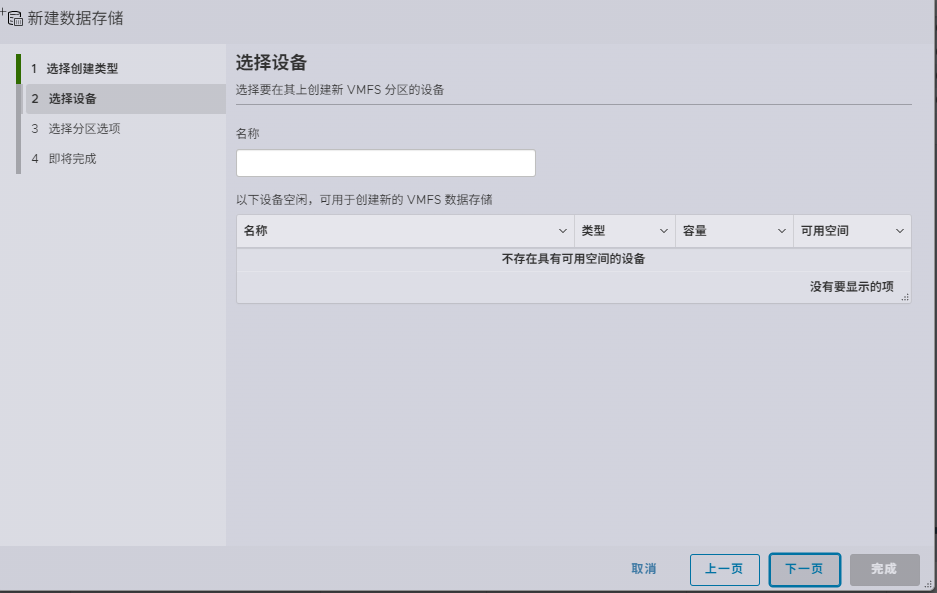
/etc/init.d/hostd restartOne way to confirm the drive is truly gone: open the New Datastore wizard, and it reports no devices with free space available.
Stage 5: Fixing Windows 10 disk 100% while idle
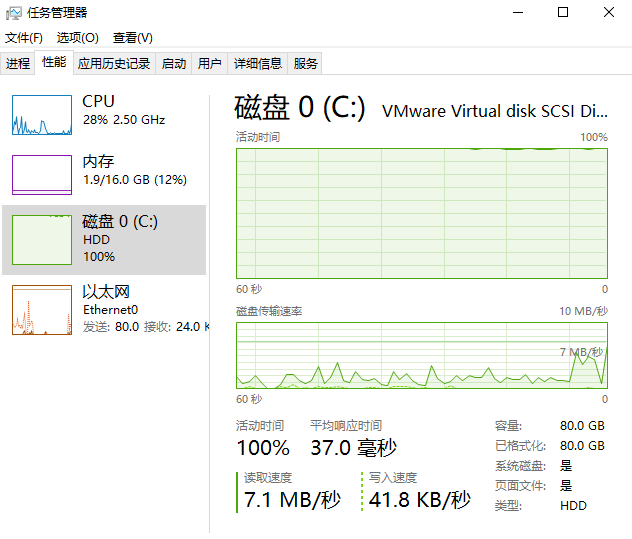
Migration done. But the win10 VM, just sitting there running a customer-service client and a few browser windows (a fingerprint browser, multi-window), showed disk active time stuck at 100%, average response time 37ms to 290ms — while read/write rates were only tens to hundreds of KB/s.
The culprit: Windows 10 idle maintenance, TiWorker.exe
The diagnosis had a twist: the moment I clicked “Open Resource Monitor” at the bottom of Task Manager to investigate the writes, disk active time dropped from 100% to 0% in an instant, and response time fell back to 0.5 ms. The monitor list showed what had just been running: TiWorker.exe (Windows Modules Installer Worker) and System (page file swapping).
Here is what happens: when Windows 10 sees no keyboard or mouse input for a long time (the VM is idle), it wakes TiWorker.exe to check for updates and clean up components. A single 7200 RPM hard drive tops out at roughly 80 IOPS of random 4K I/O, so a burst of small-file scanning fills the disk queue instantly. And the moment you touch the machine to open Resource Monitor, Windows decides “a user is here” and pauses the background maintenance — which is why the disk usage drops to zero the second you look, and why so many people never find the cause.
A four-step permanent fix for an idle VM
The GUI “Pause updates” option greys out once it hits the 35-day limit, so for a machine that just sits there, do all four steps:
- Turn off automatic updates for good, cutting off the TiWorker.exe trigger. Pro/Enterprise:
Win + R, rungpedit.msc→ Computer Configuration → Administrative Templates → Windows Components → Windows Update → double-click “Configure Automatic Updates” → set to Disabled. Or use these registry commands (run CMD as administrator; this pushes the pause deadline to 2099):
reg add "HKLM\SOFTWARE\Policies\Microsoft\Windows\WindowsUpdate\AU" /v NoAutoUpdate /t REG_DWORD /d 1 /f
reg add "HKLM\SOFTWARE\Microsoft\WindowsUpdate\UX\Settings" /v PauseUpdatesExpiryTime /t REG_SZ /d "2099-12-31T00:00:00Z" /f- Disable the related services. Run
services.mscand stop Windows Update, SysMain, and Windows Search, setting each startup type to Disabled. - Turn off the maintenance wake timer. Control Panel → System and Security → Security and Maintenance → Maintenance → Change maintenance settings, and uncheck “Allow scheduled maintenance to wake up my computer at the scheduled time”.
- Turn off the C: page file. With 16GB of physical RAM assigned and only about 6GB used while idle, run
sysdm.cpl→ Advanced → Performance Settings → Advanced → Virtual memory → Change, uncheck automatic management, and set C: to “No paging file”. That kills the random page-file writes from the System process entirely. - Whitelist folders in Windows Defender. Windows Security → Virus & threat protection → Manage settings → Add or remove exclusions, and add the install and cache folders of the multi-window browser and the customer-service client, so real-time protection stops scanning their web caches constantly.
Checklist: the whole migration in one list
The copy itself was the easy part. The troubleshooting took the time. Here is the list to run through next time:
- Confirm the new drive in iDRAC first: event log, job queue, disk status.
- Do not copy large
.vmdkfiles in the browser — Cancel is greyed out. Usevmkfstools -i -d thin. - Do not switch the boot disk controller to PVSCSI directly. Attach a temporary PVSCSI disk to load the driver first.
- If unmounting a datastore fails with “in use” but no VM shows up:
grepevery.vmxand check handles withlsof. The registration, the swap path, and ISO references are all suspects. - If copying config files fails with
Path does not exist: check withls -ldwhether the target is a symlink. - Standalone ESXi has no Detach button — use
esxcli storage core device set --state=off. - Pull the drive 2 cm out, wait 30 seconds for the platters to stop, then remove it.
- Win10 idle disk 100% with tiny throughput: check
TiWorker.exefirst, then do the four-step fix — updates off, wake timer off, page file off, Defender exclusions on.
One last reminder: if you follow this and post your own screenshots, black out management IPs, hostnames, and disk serial numbers before publishing.
Frequently asked questions
The browser copy of a large .vmdk is stuck and Cancel is greyed out. What now?
Open ESXi SSH and restart hostd to release the file lock (/etc/init.d/hostd restart — restarting hostd does not restart the host, and other VMs are unaffected), then clone with vmkfstools -i … -d thin instead. Thin provisioning skips empty blocks.
I switched the boot disk controller to PVSCSI and got a blue screen. How do I recover?
Power off, change SCSI controller 0 back to LSI Logic SAS, save, and power on — it boots right away. To use PVSCSI properly, attach a temporary PVSCSI secondary disk first while the system is running so Windows loads the driver, then switch the boot disk controller.
Unmounting a datastore fails with “in use”, but no VM shows up as using it. What is holding it?
Check from SSH: grep all .vmx files for the datastore name or volume UUID, and use lsof to check live handles. Common culprits are the VM’s .vmx, .nvram, and logs still registered on the old volume, or leftover swap file paths (sched.swap.derivedName) and ISO references (sata0:0.fileName) inside the .vmx.
Windows 10 sits idle with disk 100% but almost no throughput. What causes it?
Most likely Windows 10 idle maintenance: TiWorker.exe wakes up to check updates and clean components, plus System page file swapping. A 7200 RPM drive manages only about 80 random 4K IOPS, so small-file scans fill the queue instantly. Fix it with the four steps in this post: turn off automatic updates, disable the maintenance wake timer, turn off the C: page file, and whitelist app folders in Windows Defender.
Related reading
- The Ultimate Guide to Installing Windows 11 IoT LTSC on ESXi: Bypassing TPM, Forced Logins, and Troubleshooting — installing Windows 11 on the same host, start to finish.
- Accidentally Updated Your Xpenology to DSM 7.3 and Lost Access? A Simple RR Loader Recovery Guide — rescuing the NAS VM that runs on the same host.
- Self-Hosting RustDesk with Docker: The Ultimate Guide from OpenWrt Port Mapping to Virtual Displays — self-hosted remote desktop on the same home infrastructure.