
Can a 12GB RTX 3060 run MiniMax H3 Image locally in ComfyUI? Yes — with a 1TB data disk for the model library, the right 16-channel VAE, ComfyUI v0.45.0 or newer, and the 12GB quantized workflow. This is the full setup log: storage mapping, the pixel_space VAE crash, the missing MiniMaxH3ImageConditioning node, quantized model downloads, and resolution tuning up to 5.5K.
Running a modern multimodal image model on a consumer card — especially a 12GB sweet-spot card like the RTX 3060 — usually hits three walls: the system disk runs out of space, large models download slowly and get blocked, and new workflows fail on missing core nodes. This post is the complete log of setting it up on one machine and getting MiniMax H3 Image running locally, including the two errors that cost the most time and how each was fixed.
One note up front: everything below was done on a virtualized GPU passthrough node. Your paths and package versions will differ; the failure modes and fixes should transfer.
1. Hardware and Software Stack
- OS: Ubuntu 22.04 LTS
- GPU: NVIDIA GeForce RTX 3060 (12GB VRAM)
- System memory: 48GB DDR4
- Storage: 1TB dedicated data disk
- Runtime: Python 3.12.3 / PyTorch 2.14.1+cu130 (supports the latest CUDA quantization operators and DynamicVRAM dynamic VRAM offloading)
- WebUI: ComfyUI, upgraded to the v0.45.0 main branch, running as a systemd service
2. Storage: A 1TB Data Disk for the Model Library
A single model file is easily 10–20GB. Keeping the models on a dedicated data disk at /data, separate from the ComfyUI program itself, stops the system disk from filling up and makes the same library reusable across multiple environments.
First, create the standard ComfyUI model directory tree under /data/comfyui_models:
mkdir -p /data/comfyui_models/{checkpoints,clip,clip_vision,configs,controlnet,diffusers,diffusion_models,embeddings,gligen,hypernetworks,loras,photomaker,style_models,text_encoders,unet,upscale_models,vae,vae_approx}Then edit extra_model_paths.yaml in the ComfyUI root directory so every model lookup path points at /data/comfyui_models/. Restart the service and check the log:
sudo systemctl restart comfyui
sleep 3
sudo journalctl -u comfyui -n 45 --no-pager | grep -i "Adding extra search path"
When the terminal prints one [INFO] Adding extra search path ... /data/comfyui_models/... line per model directory, the external storage mapping is live.
3. Pitfall #1: The pixel_space VAE Decode Error
While testing a base workflow (Z-Image Turbo), sampling finished fine — 8 steps took about 16 seconds on the RTX 3060 — but the run crashed at the final SaveImage node:
TypeError: Cannot handle this data type: (1, 1, 16), |u1
TIPS: This can happen when 'pixel_space' is selected in the Load VAE node. Select the VAE that matches your model instead.
Why it happens: modern flow-matching image models use a 16-channel latent space. If the Load VAE node keeps its default pixel_space, the undecoded 16-channel tensor goes straight into the image-saving node, and the imaging library (PIL) cannot make sense of the channel dimensions.
The fix: download the matching 16-channel ae.safetensors into the vae directory with the multi-threaded downloader aria2c, straight from Hugging Face:
sudo apt install -y aria2

aria2c -x 16 -s 16 -k 1M -c \
  -d /data/comfyui_models/vae \
  -o ae.safetensors \
  "https://huggingface.co/Comfy-Org/z_image_turbo/resolve/main/split_files/vae/ae.safetensors"
Back in the web UI, press R to refresh the node list, then change the Load VAE dropdown from pixel_space to ae.safetensors. Images save normally after that. If Hugging Face is slow from your location, the same path works on the hf-mirror.com mirror — just swap the host in the URL.
4. Deploying MiniMax H3 Image (12GB Quantized Build)
MiniMax H3 ships an official workflow template built for 12GB VRAM (minimax_h3_image_12gb_vram). It pairs an int8_convrot main diffusion model with an nvfp4_awq 4-bit quantized vision-language text encoder, and with 48GB of system memory acting as pinned-memory cache, it runs on a consumer card.
Models needed, and where they go:
| Model file | What it does | Directory (/data/comfyui_models/...) |
|---|---|---|
minimax_h3_image_pruned_int8_convrot.safetensors | MiniMax H3 quantized main image model | diffusion_models/ |
qwen3vl_32b_minimax_h3_nvfp4_awq.safetensors | 32B multimodal vision understanding and text encoder (~14.6GB) | text_encoders/ |
qwen3.5_9b_w4a8_gptq.safetensors | 9B local prompt auto-expansion (Prompt Upsampler) model | text_encoders/ |
minimax_h3_image_vae_fp16.safetensors | MiniMax H3 dedicated half-precision VAE decoder | vae/ |
Large weights download best with aria2c and a standard browser User-Agent — some mirrors answer default clients with HTTP 403, and the UA header gets around it. In testing, this held a steady 25–30 MiB/s:
UA="Mozilla/5.0 (Windows NT 10.0; Win64; x64) AppleWebKit/537.36 (KHTML, like Gecko) Chrome/128.0.0.0 Safari/537.36"

# 1. Download the Qwen3-VL 32B vision encoder (14.61 GB)
aria2c -x 16 -s 16 -k 1M -c -U "$UA" \
  -d /data/comfyui_models/text_encoders \
  -o qwen3vl_32b_minimax_h3_nvfp4_awq.safetensors \
  "https://huggingface.co/Comfy-Org/MiniMax-H3/resolve/main/text_encoders/qwen3vl_32b_minimax_h3_nvfp4_awq.safetensors"
If a weight file has not appeared on Hugging Face yet, the same file is also mirrored on ModelScope under the resolve/master/ path. And if Hugging Face itself is slow from your location, the same URLs work on the hf-mirror.com mirror — just swap the host.
5. Pitfall #2: MiniMaxH3ImageConditioning Unknown Node
With all models in place, loading the workflow still showed a warning in the “Workflow Overview → Issues” panel: missing node package (unknown package) MiniMaxH3ImageConditioning.
The lookup went through ComfyUI-Manager’s local node-map database, extension-node-map.json (replace the path with your install directory):
python3 -c '
import json
with open("/path/to/ComfyUI/custom_nodes/ComfyUI-Manager/extension-node-map.json", "r", encoding="utf-8") as f:
    data = json.load(f)
for url, info in data.items():
    if "MiniMaxH3ImageConditioning" in info[0]:
        print("Repository URL:", url)
'
The result pointed straight at https://github.com/comfyanonymous/ComfyUI itself — this node is not a third-party plugin at all, but a native core node that had just landed in ComfyUI’s main branch.
The fix: pull the latest ComfyUI source (v0.45.0 or newer), sync the Python dependencies, and restart:
cd /path/to/ComfyUI
git pull
./venv/bin/pip install -r requirements.txt
sudo systemctl restart comfyui
After the restart, confirm comfy_extras/nodes_minimax_h3.py has registered the node, then hard-refresh the browser with Ctrl + F5 to clear the frontend cache. All red warnings clear.
6. Tuning: Resolution and Multi-Image Reference
Resolution and Speed
Once the workflow runs, the default output is 5472 × 3072 — about 16 megapixels, 5.5K ultra-HD. For everyday drafting or 1080p/2K material, lower it and generation gets 3–4× faster.
The size control group at the top left of the workflow computes dimensions from total megapixels, always rounded to a multiple of 32:
- 2K fast mode: find the
16 MP (off = 4 MP draft)switch and flip it fromtruetofalse. The workflow then uses theDraft megapixelsdefault of4.0— 2688 × 1504 at 16:9, or 1504 × 2688 at 9:16. Latent token count drops to a quarter of the original, andVAEDecodeTiledslices far less, so a single image finishes much faster. - Exact 1080p mode: with the same switch off, change
Draft megapixelsfrom4.0to2.1— output is a stable 1920 × 1088 (landscape) or 1088 × 1920 (portrait).
Reference Pictures: 10 Slots, Ctrl+B to Enable
The green group box at the bottom of the canvas offers 10 reference-image slots (Picture 1 to Picture 10). By default they are dark purple and translucent — bypassed, so plain text-to-image skips them entirely:
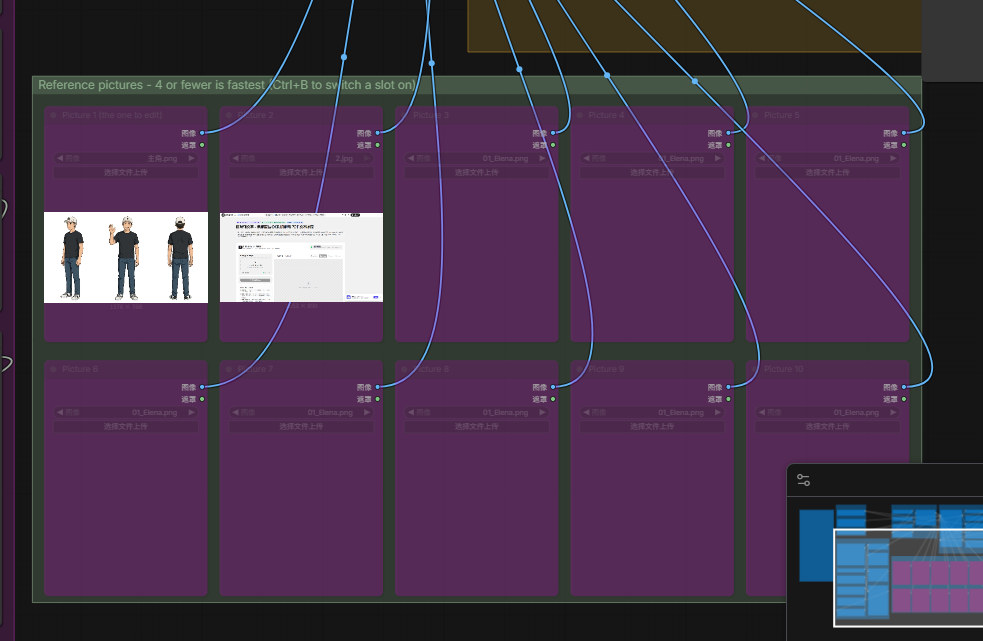
To activate a slot: click the card you need (for example Picture 1), press Ctrl + B to lift the bypass — the card turns light grey — then upload the reference image. The official recommendation is to enable 4 or fewer slots for the fastest encoding.
Picture 1 (the one to edit): the main image to edit, or the first reference subject.Picture 2toPicture 10: additional references for character, clothing, style, or props.- Prompt syntax: refer to slots precisely with angle-bracket tags in the
PROMPTbox, for example:let the character in <Picture 1> wear the mecha from <Picture 2>, standing on a neon street on a rainy night, keeping the face consistent.
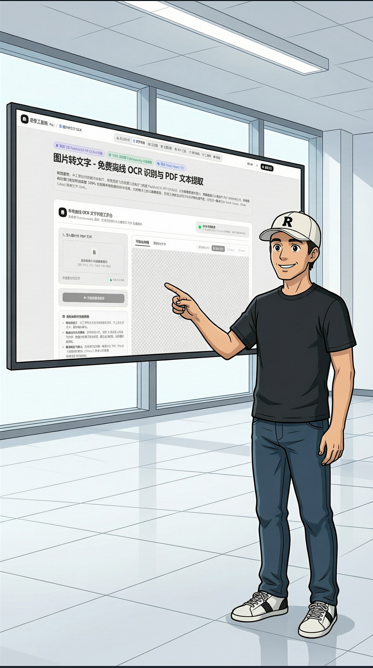
One result from this setup — the character from Picture 1 presenting the website from Picture 2 on a floating screen, both in frame:
7. Summary
On a 12GB RTX 3060, PyTorch 2.14 with ComfyUI’s DynamicVRAM management plus a 48GB pinned-memory cache is enough to run a 32B multimodal encoder and a quantized diffusion model locally. The practical workflow: draft compositions fast in 4MP mode, lock in a seed you like, then flip the 16MP switch for a 5.5K final image.
Related Reading
- Z-Image Beginner’s Guide: Pro Posters on 6GB VRAM! (ComfyUI Config Included) — the same Z-Image workflow from section 3, set up from scratch.
- ComfyUI Tutorial 1: Master Local AI Image Generation from Scratch — the basics, if this is your first ComfyUI install.
- How to Run Flux.1 Locally: The Most Powerful Open-Source Image Generation Model — another open-source image model on consumer hardware.
- The Ultimate Local LLM Deployment Guide: From Bare Metal Builds to Polished AI Powerhouses — local deployment, from bare metal to a finished setup.